Home Improvement

Tile Installation – Laying and Cutting Tiles

Installing tiles requires special tools for cutting and laying the tiles. It’s also important to understand how the subfloor (such as plywood, cement backer board, or uncoupling membrane) must be prepared for tiling.

For best results, begin with two perpendicular chalk lines in the center of the room. Adjust these chalk lines until tile measurements at opposite walls are the same. For more information just visit Bathroom Remodelers Milwaukee.

The first step in laying tile is creating a layout plan for the project. This will help the installer estimate the product needed and identify any potential installation issues caused by architectural features like stairs or transitions. It will also give them a better sense of how the finished floor will look.

The most basic tile layout is a grid pattern, which minimizes the number of cuts and provides a neat, uniform finish. However, this can also result in a dull or sterile space if the tiles need to be more interesting or the design needs to be more complex. Mix and match different tile sizes to create a unique pattern or experiment with a more complex layout, such as herringbone.

When planning a tile layout, it’s important to start in the center of the room and work outwards. It can be tempting to pick a wall and start laying tile there, but this will leave the final product looking crooked. It is best to apply a row of tiles from the center and then move outwards, including some tile spacers between each row.

This method works well for standard tile sizes but can be challenging with larger tiles or ones with an unusual shape. In these cases, taking a piece of graph paper and sketching a detailed layout blueprint is helpful. This will allow you to see if any rows require sliver cuts, which can be difficult to correct later.

When setting irregular tiles, a grid layout is usually the best option. This will ensure that the grout lines are evenly spaced so they won’t appear squished or uneven. If you’re using a natural stone tile, consider the appearance of its unique veining patterns and color variations in your design plan. These features can add a lot of visual interest to the finished room. If you need help with your layout, ask a professional for assistance. They’ll be able to walk you through the process and suggest ways to improve the results.

Before beginning the tile installation, you must ensure the substrate is ready. You should use a cement backer board or a similar material that is also waterproof. It should also be able to support the weight of your tiles. This is important because too much weight on a small area could cause it to crack or even break.

The type of substrate you need will depend on the type of tile and its intended use. If your tile is installed in a moisture-prone area, you may need a special waterproof membrane or self-leveling underlayment. You should also figure out whether you need a transition at doorways available in various styles and materials.

Plywood is acceptable as a substrate for some flooring applications, but it should be exterior-grade and only in dry areas. There are better choices for wall tiles, although they can be used as a layer of underlayment for tile over wood. It is often combined with another layer of underlayment, such as a crack isolation membrane or an uncoupling membrane.

Before installing the tile, ensure you have all the necessary tools and supplies. Most home centers carry most of these, but you’re better off shopping at a specialty tile store, where you can get expert advice and more extensive product selections.

You will also need to choose a thinset mortar, the adhesive that holds the tile in place. Thinset typically combines Portland cement, fine sand, and water. For best results, you should use a trowel that has notches the size of your tile’s thickness to mix it and create grooves in the mortar that will improve adhesion.

Once you’ve mixed the thinset, you should allow it to “slake” for about 10 minutes, which is when it becomes thicker and denser. Then, you can begin laying the tile. Work in easy-to-manage sections, and avoid walking on the newly laid tile until it’s completely set.

Cutting tiles is an essential part of any tiling job. Even the most straightforward jobs require some cutting to fit pieces in corners or work around obstacles. Different cuts need different methods and tools, so planning for the types of cuts you’ll be making is important to ensure a professional-looking finished product and minimize wasted material.

The most common type of cut for tile is a straight cut. To make a straight cut, mark the tile where you want to make your cut with a pencil guideline. Then, use a tile cutter or wet saw to cut off the tile. When using a power tool, always insert notches into the tile before cutting it completely to lessen the chance of chipping. If you don’t have a tile cutter, use a Dremel or an angle grinder with a diamond blade. Notching your tile is also helpful if you work with curved cuts, which can’t be made with snap cutters.

If you’re using a wet saw, follow all manufacturer instructions for safety and accuracy. Also, wear safety goggles and gloves and keep water and dust out of your lungs. Using a hand tool, use industry-grade clamps to hold the tile in place and avoid accidentally chipping it. After the tile has been cut, clean up the edges with a rubbing stone to smooth them out if needed.

When it comes to curve cuts, the best way to do them is freehand, but you can also use a tool called a contour gauge or round objects like cans or lids to help you create a curved line. Then, use a tile cutter to score the tiles where you’ll need to cut them and nip off the excess with a tile nipper. If you’re working with a nipper, squeeze it firmly to make a small nip and not push too hard, or the handle will break the tile.

You can also use a Dremel tool with a diamond blade or an angle grinder with a masonry bit for smaller curved cuts. When working with a curved surface, apply slow and steady pressure to minimize the possibility of breaking the tile.

Professional tile installers work bare-handed, but you should wear gloves if you have sensitive skin. Mixing and working with cement products like thinset can draw moisture from your skin, resulting in burns requiring medical attention. Also, it would be best to consider wearing eye protection when mixing and installing tiles.

The most important step in your tile installation is establishing the layout. A good design ensures that trimmed portions of tiles are symmetrical from side to side and that grout lines are level and plumb. For wall tile projects, layout perpendicular layout lines using chalk to guide your tiling.

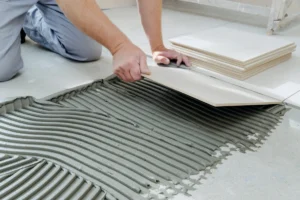
Before spreading your thin set, spray the backer board lightly with water to prevent it from soaking up too much of the chipset. This can cause the mortar to dry too quickly, affecting how well it bonds with the subfloor.

Apply the thinset with the notched edge of your trowel, which should be set to a size that matches your tile thickness. After you’ve spread a thin coat, comb it with your trowel to create furrows, which helps release air bubbles underneath the tile. Searching the light set in one direction is crucial because if you move in a circular motion, you’ll leave hollow points under your tiles.

Press it into the thinset with firm, even pressure when laying your first tile. After you’ve placed it, lift it and check for a solid layer of thin set with 80-90% coverage across its back surface. If you don’t have enough thin-set on the back, recheck the consistency of your thin-set and reapply it to the back of the tile.

Use plastic spacers to maintain consistent spacing between rows while laying the tiles. For example, keeping the vertical grout joints offset by exactly half of the tile width is critical if you’re using a running bond pattern.

At this point, you can see the real payoff of your planning efforts. As long as you follow the guidelines in this article, your tile project will look great and last a very long time.

Portable Restroom

Benefits of Bathroom Pods

Outdoor Bathroom Pods are a valuable construction solution for multifamily apartment projects. They can save project teams time and money while providing a higher level of quality than traditional bathrooms.

Tight design and manufacturing processes in an offsite environment mean fewer defects. Streamlined installation reduces waste levels and makes for a cleaner job site.

portable restroom

Bathroom pods are designed, built, and quality-approved in a controlled factory environment, which is far more efficient than traditional construction on site. For example, prefabricated wall and floor panels can be machined in the factory, ensuring that the design is fully adhered to and that each panel is a precise fit, saving time on site. Similarly, the production process is more predictable and streamlined so that trades can work with greater precision on tasks such as electrical installations, tiling and sealant application, something that is difficult to control on site.

A modular approach also provides the opportunity to reduce the number of different suppliers required on a project, delivering cost savings. For instance, a conventional construction would typically require multiple different bathroom products from a range of manufacturers and multiple subcontractors such as plumbers, electricians, glaziers, tilers, interior designers and carpenters. This is not only inefficient but can lead to disputes and delays on a project.

With bathroom pods, the manufacture and construction is completed by a single supplier, removing the need to coordinate and manage multiple supply chains. This streamlined process also allows each pod to be fully tested and quality-approved prior to shipping, which reduces the risk of defects on site.

Increasingly, manufacturers of pods are designing each design to be fast and simple to install on site, for example, with mechanically-fitted pan connectors and pre-wired junction boxes to simplify plumbing and electrics. This efficiency enables the bathroom to be offloaded, lifted, and installed on the floor in just hours – significantly faster than it can be constructed on site and reducing the need for additional storage on site. This translates into a faster return on investment for the developer or early occupation for the client, as well as reduced snagging and the assurance of completion on time and within budget.

Bathroom pods are manufactured in a controlled offsite environment, meaning they can be produced in parallel with on-site construction and installed quickly, reducing overall project timelines. They also allow for tight quality control and consistency, which reduces the risk of problems on site. This can be a significant benefit on complex projects where multiple trade professionals are working in limited space and constructing precise finishes.

When choosing a manufacturer to supply pods, ensure they have a good track record and financial stability. A visit to their factory can also be beneficial, as it allows you to inspect the manufacturing process and see if they can meet your specifications. The company should also be able to demonstrate their expertise in design and construction.

Another factor in shortened construction times is that bathroom pods are completed offsite, so there is no need for tradespeople to travel back and forth to site with building materials. This helps to keep onsite disruption and noise levels low, creating a safer and more efficient work environment.

The design of bathroom pods also makes them more energy-efficient. In addition, the manufacturing process of these prefabricated units uses fewer raw materials than traditional onsite construction, which results in a lower carbon footprint. This is ideal for construction projects that are focused on sustainability and green building certifications.

Finally, prefabricated bathroom pods require less storage space, as they can be delivered to a construction site fully completed. This means there is no need for builders to find additional storage space or create a bespoke storage solution on a busy construction site. The reduced program saved through the use of pods can result in faster returns for developers or early occupation for clients.

Pods can be designed and built in a range of sizes and dimensions to meet different project requirements. As they’re prefabricated in a controlled factory environment, the quality and standards remain consistent from one unit to another – making them an ideal construction method for complex or multiple occupancy developments such as hotels, schools, hospitals, or student accommodation.

Using bathroom pods also provides significant flexibility on a construction site. As a result, the overall construction programme can be reduced significantly and completed to an earlier date. This helps reduce construction loan interest and enables tenants to move in sooner, giving a better return on investment for developers.

The use of bathroom pods also eliminates a large number of work at heights and reduces the amount of heavy materials that need to be transported around the construction site. This reduces risks for workers, improving safety and reducing the number of accidents that occur on site.

Another advantage of bathroom pods is that they can be designed and manufactured to include domestic water piping, electrical components, lighting, and GFCI (ground-fault circuit interrupter) whips that are ready for connection. This means that installers don’t have to spend time laying out and cabling these connections on site, which helps improve productivity.

Achieving this level of flexibility does require some upfront planning and an early design freeze so that the bathroom pod manufacturer can order all of the components and start manufacturing. However, the payback in terms of increased productivity on site and a quicker completion schedule will more than offset this initial hard cost.

Pods are built with light gauge steel framing for superior strength and accuracy, as well as moisture-resistant wallboard that ensures the unit will last. They’re also delivered fully finished to the job site, meaning you don’t have to pay extra for installation, labour and materials like with traditional on-site construction. These savings add up over the course of your project, helping you save money and stay within budget.

Bathroom Pods are also made offsite, which means you eliminate the need to coordinate several subcontract trades at the same time. This reduces the amount of labour, supervision and equipment requirements on-site – as well as cutting down on materials wastage and storage costs.

Another advantage of using pods is that they’re often built to higher quality standards than those constructed on-site, which helps you achieve better results for your clients and minimize any defects in use. For example, the tiling is typically set in such a way that it won’t come loose over time, and the caulking joints have a smooth finish.

Although bathroom pods offer many benefits, they do require some planning and coordination to get right. This includes early design freeze to ensure the pods are designed to fit seamlessly into your building and are manufactured efficiently, as well as careful sequencing of the site works to avoid clashes. Using pods can also have a commercial impact on your project’s cash flow, as the upfront procurement of high-cost fitting-out materials is essential. However, the long-term cost benefits of using pods far outweigh this initial investment.

Bathroom pods are designed and built in accordance with project-specific requirements and dimensions. They can be used in a wide range of buildings, from student accommodation to military housing. The design of the pods is adapted for each use and a full range of plumbing, electrical and other services can be fitted. Unlike site-based construction, there is often only one pod supplier for all the products and materials that need to be delivered to site, simplifying procurement and mitigating delays caused by multiple suppliers bringing in different materials.

The production line environment of offsite manufacture can also offer consistency and improved productivity, while the repetitive nature of pod production makes it much easier to achieve consistent quality standards than on site. Pre-delivery testing in the factory should be stringent, with any defects rectified and remedied prior to installation, to minimize the risk of any on-site issues.

With offsite production, the waste produced on a construction site can be reduced. This is because the factory uses lean processes that optimize the use of materials and eliminates waste. There are also strict environmental regulations in place that ensure a high level of sustainability and compliance.

Increasing demand for quick and efficient construction solutions during the pandemic drove growth in the global prefabricated bathroom pods market. This was due to the urgent need to build hospitals and isolation facilities, which were unable to be constructed in time using traditional methods.

As the market continues to recover, we are seeing more developers looking into the benefits of using pods in their developments. They can help reduce programme, meaning that properties are occupied sooner and return on investment is gained earlier too. This can save on construction loan interest, giving a more rapid return to investors.